实验3:配置EKS弹性集群并运行压力测试
业务系统的弹性常常直接影响到我们的客户体验,甚至业务的可用性,当我们遇到比往常更多的业务请求、你当然不会希望业务系统会不堪重负。而当业务需求处于峰谷时,我们也不希望过多的资源空闲产生无效的成本和能源浪费。如果合理的自动控制负载能对我们通用至关重要。
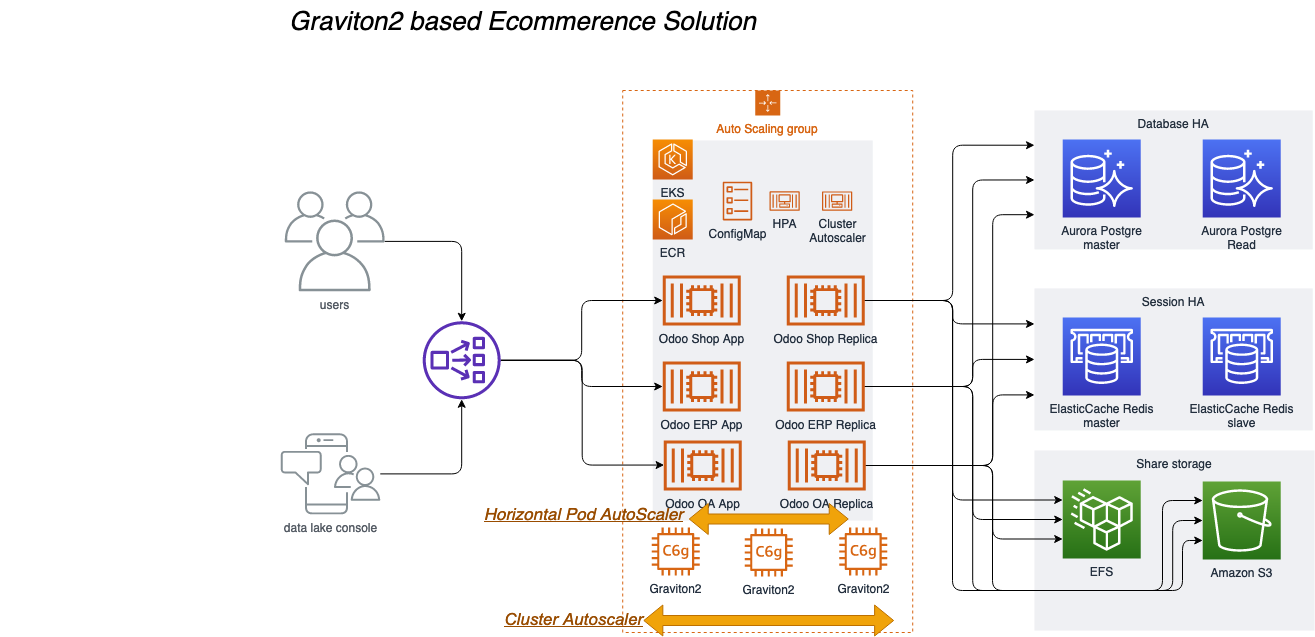
在本章节我们对我们的实验集群进行两个弹性控制配置,通过大并发模拟检验系统的可用性,评估是否满足生产系统要求。我们将完成下面架构图的模拟:
本章节的实验中我们将涉及到以下关键技术点:
Horizontal Pod AutoScaler
Horizontal Pod Autoscaling可以根据CPU使用率或应用自定义metrics自动扩展Pod数量(支持replication controller、deployment和replica set)。控制管理器每隔30s(可以通过–horizontal-pod-autoscaler-sync-period修改)查询metrics的资源使用情况,并判断是的对Pod的数量进行调整
Cluster Autoscaler
Cluster AutoScaler 是一个自动扩展和收缩 Kubernetes 集群 Node 的扩展。当集群容量不足时,它会自动去 AWS 创建新的 Node,而在 Node 长时间(超过 10 分钟)资源利用率很低时(低于 50%)自动将其删除以节省开支。
Sopt实例
Spot 实例是备用 EC2 容量,最多能够为您节省 90% 的按需价格,此类实例可由 AWS 通过 2 分钟通知予以中断。. Spot 实例使用与按需和预留实例相同的底层 EC2 实例,最适合具有容错能力且灵活的工作负载。. Spot 实例为获得计算容量提供了另一种选项,并且能够与按需和预留实例搭配使用.
在本章节,我们将深入剖析解决方案架构的应用层弹性,实验步骤如下:
-
配置集群监控Kubernetes dashboard
-
配置Pod弹性规则 Horizontal Pod AutoScaler
-
为EKS集群启动Spot实例的节点组
-
配置EKS集群节点扩展 Cluster Autoscaler
-
运行大负载压力测试
-
观察成本消耗
部署 Kubernetes dashboard
部署 Kubernetes Metrics Server
1,请SSH至您的堡垒机,例如:
ssh -i "workshop.pem" ec2-user@ec2-54-176-92-104.us-west-1.compute.amazonaws.com
如果您是第一次登陆堡垒机,- 请先执行update-kubeconfig命令将配置本机的kubeconfig文件,若您没有改变默认参数,完整命令如下。
aws eks --region us-west-1 update-kubeconfig --name odoo
ps:如果您已经在实验1中为本地的aksk添加了configmap的授权,您也可以在本地执行本实验后续的操作。
2,通过以下命令部署 Metrics Server
kubectl apply -f https://github.com/kubernetes-sigs/metrics-server/releases/download/v0.3.7/components.yaml
3,验证 Metrics Server 是否部署成功请执行以下命令:
kubectl get deployment metrics-server -n kube-system
输出:
NAME             READY   UP-TO-DATE   AVAILABLE   AGE
metrics-server   1/1     1            1           11s
- Kubernetes Metrics Server 是集群中资源使用情况数据的聚合器,它在 Amazon EKS 集群中默认不部署。Kubernetes Dashboard 使用 Metrics Server 来收集集群的指标,例如 CPU 和内存随时间的使用情况。
部署 Kubernetes Dashboard
1,通过以下命令部署 Kubernetes Dashboard
kubectl apply -f https://awspsa-quickstart.s3.amazonaws.com/awspsa-odoo/scripts/recommended.yaml
输出
namespace/kubernetes-dashboard created
serviceaccount/kubernetes-dashboard created
service/kubernetes-dashboard created
secret/kubernetes-dashboard-certs created
secret/kubernetes-dashboard-csrf created
secret/kubernetes-dashboard-key-holder created
configmap/kubernetes-dashboard-settings created
role.rbac.authorization.k8s.io/kubernetes-dashboard created
clusterrole.rbac.authorization.k8s.io/kubernetes-dashboard created
rolebinding.rbac.authorization.k8s.io/kubernetes-dashboard created
clusterrolebinding.rbac.authorization.k8s.io/kubernetes-dashboard created
deployment.apps/kubernetes-dashboard created
service/dashboard-metrics-scraper created
deployment.apps/dashboard-metrics-scraper created
2,验证 Kubernetes Dashboard 是否部署成功请执行以下命令:
kubectl get deployment kubernetes-dashboard -n kubernetes-dashboard
输出:
NAME                   READY   UP-TO-DATE   AVAILABLE   AGE
kubernetes-dashboard   1/1     1            1           14m
访问kube dashboard
1,通过kubectl get svc 命令查看kubernetes-dashboard 的访问地址,命令如下
kubectl get svc -n kubernetes-dashboard
输出
NAME                        TYPE           CLUSTER-IP      EXTERNAL-IP                                                                     PORT(S)         AGE
dashboard-metrics-scraper   ClusterIP      172.20.5.87     <none>                                                                          8000/TCP        23s
kubernetes-dashboard        LoadBalancer   172.20.14.143   a79a15730415e4cec9795524e61479ac-56f4ffc2b3565063.elb.us-west-1.amazonaws.com   443:32559/TCP   23s
例如其中a79a15730415e4cec9795524e61479ac-56f4ffc2b3565063.elb.us-west-1.amazonaws.com就是您的kubernetes-dashboard访问地址,请复制到浏览器打开它。必须是他https,例如
https://a79a15730415e4cec9795524e61479ac-56f4ffc2b3565063.elb.us-west-1.amazonaws.com
ps.初次打开可能会触发浏览器安全告警,因为该https没有证书,请点击忽略
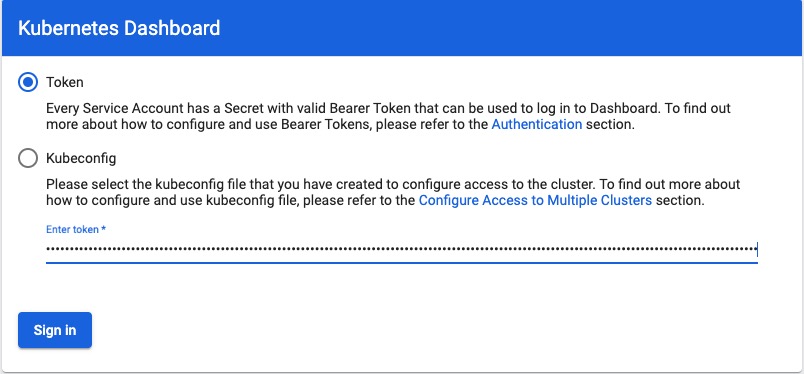
2,打开登录页面后,dashboard会要求我们输入凭证,我们需要进行如下操作获取凭证。
回到您的堡垒机,创建一个用于访问 Kubernetes Dashboard 的服务账号,并使用其 Bearer Token 令牌访问
- 创建服务账号,并绑定集群角色,在您的堡垒机运行以下命令
cat << EOF > dashboard-access.yaml
apiVersion: v1
kind: ServiceAccount
metadata:
  name: admin-user
  namespace: kubernetes-dashboard
---
apiVersion: rbac.authorization.k8s.io/v1
kind: ClusterRoleBinding
metadata:
  name: admin-user
roleRef:
  apiGroup: rbac.authorization.k8s.io
  kind: ClusterRole
  name: cluster-admin
subjects:
- kind: ServiceAccount
  name: admin-user
  namespace: kubernetes-dashboard
EOF
执行命令部署ServiceAccount,并将凭证打印到屏幕上
kubectl apply -f dashboard-access.yaml
输出
serviceaccount "eks-admin" created
clusterrolebinding.rbac.authorization.k8s.io "eks-admin" created
3,再执行以下命令将凭证打印到屏幕上
kubectl -n kubernetes-dashboard describe secret $(kubectl -n kubernetes-dashboard get secret | grep admin-user | awk '{print $1}')
输出
Name:         eks-admin-token-b5zv4
Namespace:    kube-system
Labels:       <none>
Annotations:  kubernetes.io/service-account.name=eks-admin
              kubernetes.io/service-account.uid=bcfe66ac-39be-11e8-97e8-026dce96b6e8


Type:  kubernetes.io/service-account-token


Data
====
ca.crt:     1025 bytes
namespace:  11 bytes
token:      <authentication_token>
- 现在我们拿到凭证,请复制令牌(以上token的部分),并使用令牌访问 Kubernetes Dashboard进行sign in
4,访问 Kubernetes Dashboard
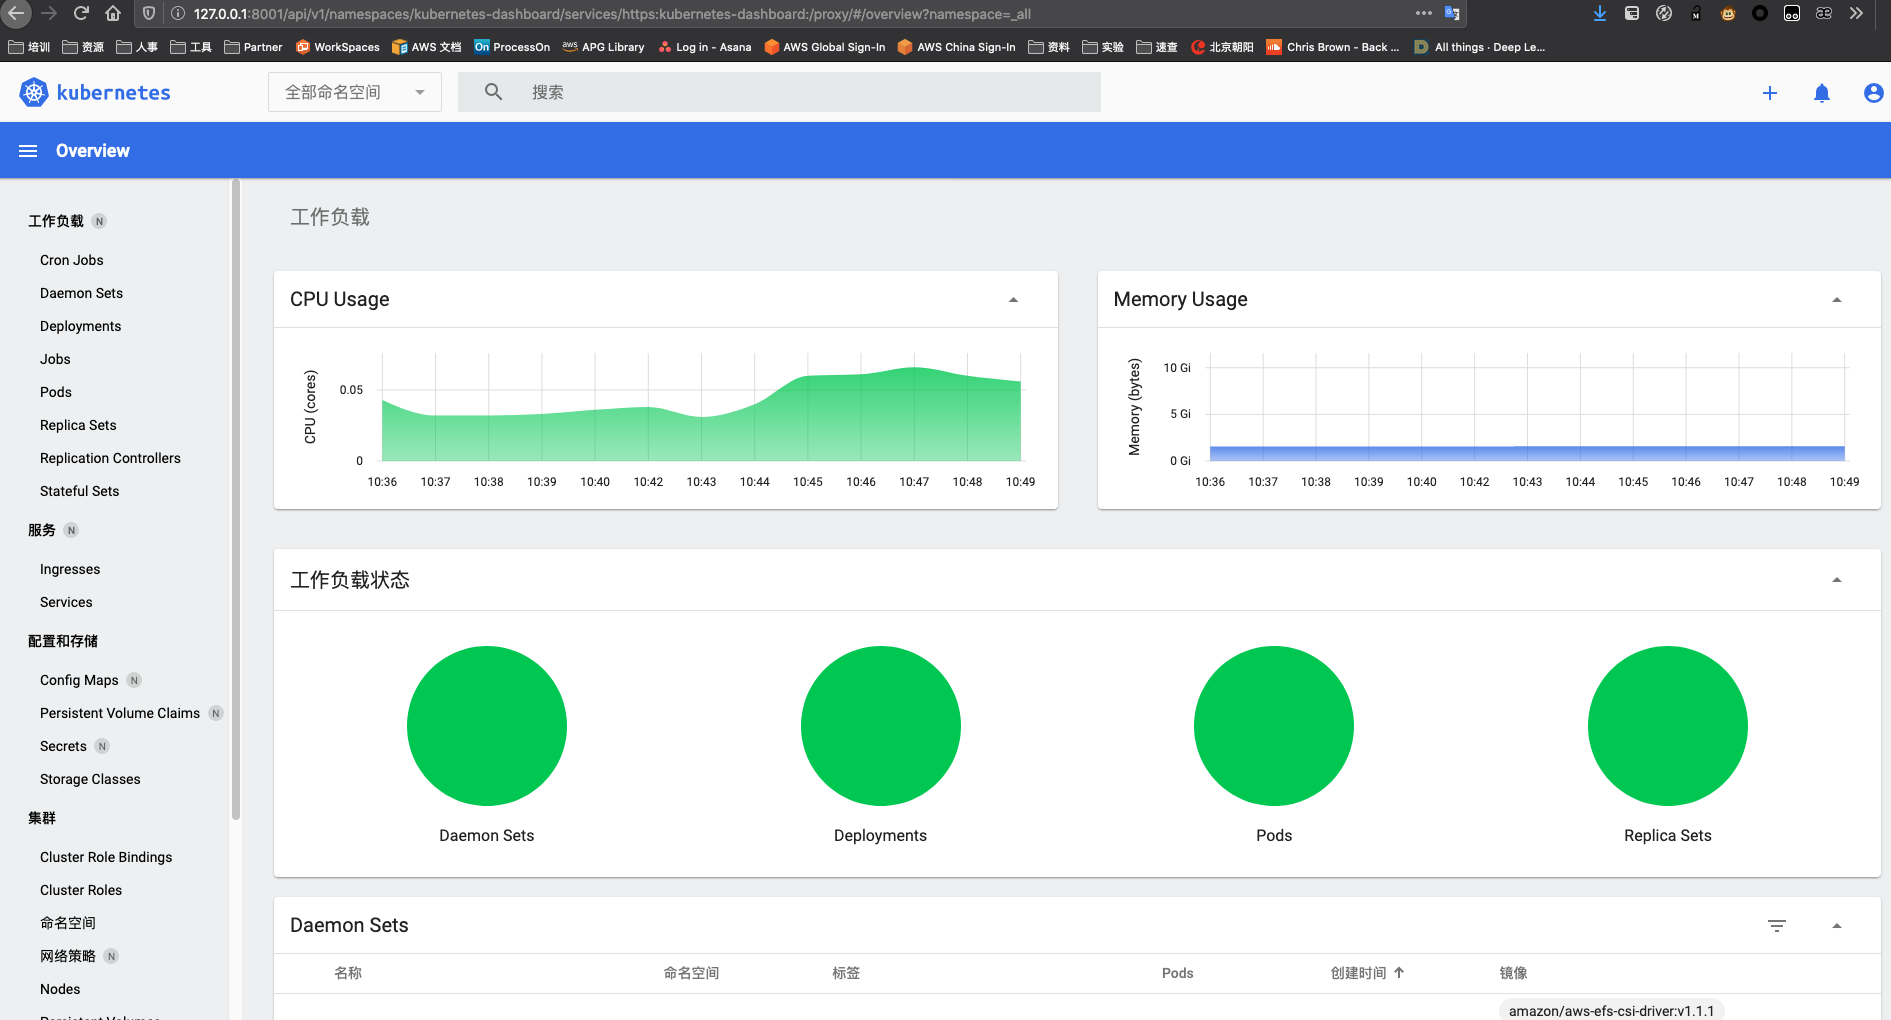
现在,您可以监控并管理EKS集群的资源,包括nodes、pods、service、configmap等。在我们的实验中,我们将通过后续的实验对集群负载施加压力,您可以通过该监控面板直观的了解资源的实时状态
配置 HPA(Horizontal Pod AutoScaler)
HPA是默认在EKS存在的功能,我们只需要对他进行配置。
1,依然在您的堡垒机对EKS集群进行操作。输入以下命令
kubectl autoscale deployment odoo-arm `#The target average CPU utilization` \
    --cpu-percent=50 \
    --min=2 `#The lower limit for the number of pods that can be set by the autoscaler` \
    --max=30 -n odoo `#The upper limit for the number of pods that can be set by the autoscaler`
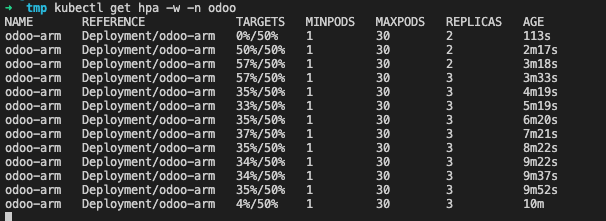
2,使用kubectl查看HPA。您可能会在1-2分钟内看到 / 50%,然后应该可以看到0%/ 50%
kubectl get hpa -n odoo
输出
NAME       REFERENCE             TARGETS   MINPODS   MAXPODS   REPLICAS   AGE
odoo-arm   Deployment/odoo-arm   1%/50%    2         30        2          17m
产生模拟压力以触发HPA缩放
1,在您的ssh环境中打开一个的窗口,然后运行以下命令以放入新容器中的Shell中
kubectl --generator=run-pod/v1 run -i --tty load-generator --image=busybox /bin/sh
2,进入到Pod以后,执行while循环以不断的访问您Odoo的页面去产生Odoo应用的压力,您可以粘贴任意您自己的Odoo页面的链接地址以模拟并发访问,例如访问odoo登录页面:http://a2171f3cd729b47f9816544bfcac9b4f-395e54af31ec6b78.elb.us-east-1.amazonaws.com/web/login 将这段URL替换下面的命令并在压力机内执行
while true; do wget -q -O - http://a2171f3cd729b47f9816544bfcac9b4f-395e54af31ec6b78.elb.us-east-1.amazonaws.com/web/login; done
强烈建议您选择内容少、数据量小的页面进行测试(例如/web/login或/contactus)。否则循环会造成大量的数量传输打印到您的终端窗口可能会导致您终端失去连接
kubectl get hpa -w -n odoo
您会看到HPA将Pod从2扩展多了(我这里扩展到了3),HPA会控制我们的Pod扩展,直到CPU平均值低于我们的目标(50%)
 ps.如果你退出了generator Pod,您可以通过命令重新进入:
kubectl attach load-generator -i --tty
您也可以通过kubectl get svc -n odoo获取您的ELB外部IP地址(EXTERNAL-IP项)
➜  kubectl get svc -n odoo
NAME       TYPE           CLUSTER-IP       EXTERNAL-IP                                                                     PORT(S)                      AGE
odoo-arm   LoadBalancer   10.100.134.178   a2171f3cd729b47f9816544bfcac9b4f-395e54af31ec6b78.elb.us-east-1.amazonaws.com   443:31604/TCP,80:30570/TCP   34d
Ps.只扩展了一个Pod是因为扩展一个已经足以承载我们模拟出的循环的访问,如果您想要更直接的看见效果可以将Odoo Pod的cpu调小,但最佳实践是一个Odoo Pod使用一个vCpu。您可以通过以下配置文件和部署命令调整Pod的CPU再运行以上测试
cat  << EOF > odoo-hpa-demo.yaml
apiVersion: apps/v1
kind: Deployment
metadata:
  name: odoo-arm
  namespace: odoo
  labels:
    app: odoo-arm
spec:
  replicas: 2
  strategy:
    type: Recreate
  selector:
    matchLabels:
      app: odoo-arm
  template:
    metadata:
      labels:
        app: odoo-arm
        tier: frontend
    spec:
      containers:
        - image: wujiade/odoo-graviton2:v3
          name: odoo-arm
          securityContext:
            privileged: true
            runAsUser: 0
          ports:
            - containerPort: 8069
              name: odoo
          resources:
              requests:
                cpu: 100m
                memory: 200Mi
          volumeMounts:
          - name: efs-pvc
            mountPath: /var/lib/odoo
          - name: config-volume
            mountPath: "/etc/odoo/"
      volumes:
      - name: efs-pvc
        persistentVolumeClaim:
          claimName: efs-storage-claim
      - name: config-volume
        configMap:
          name: odoo-config
      nodeSelector:
        kubernetes.io/arch: arm64
EOF
运行以下命令以部署
kubectl apply -f odoo-hpa-demo.yaml -n odoo
现在您可以执行kubectl attach load-generator -i --tty以便回到步骤1重新进行测试,并观察HPA进行弹性缩放的速度
测试完成后,您需要改回原来的配置,以获得更好的用户体验,并继续试验
vim odoo-hpa-demo.yaml 改回这两个值
                cpu: 600m
                memory: 1500Mi
重新执行kubectl apply -f odoo-hpa-demo.yaml -n odoo进行部署
4,现在,您可以停止(Ctrl + C)在另一个终端上运行的负载测试。您会注意到,HPA将根据其配置将副本数缓慢地增加到最小值。您还应该通过按Ctrl + D退出负载测试应用程序,否则他还在一直循环访问我们填写的地址哟。
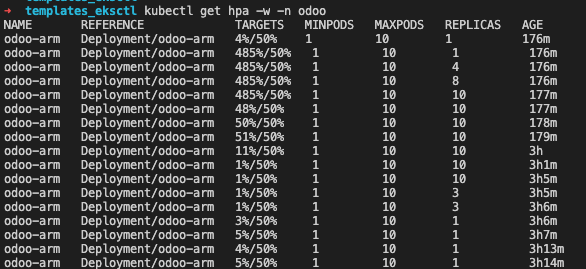 上图显示HPA自动控制POD由2个增长到10个满足负载需求,负载减小后又由10个减小为2个,已释放资源。
配置 Spot 计费模式的的EKS自动缩放节点组
1,通过eksctl 命令创建一个Spot实例的节点组
- 首先编辑文件
spot-nodegroup.yaml
执行 vim spot-nodegroup.yaml ,复制下面内容,同时请将 <name> 替换为您的eks名称(默认为 odoo),请将 <region> 替换为您的实验区域(默认为 us-west-1 )
apiVersion: eksctl.io/v1alpha5
kind: ClusterConfig

metadata:
  name: odoo
  region: us-west-1

managedNodeGroups:
  - name: ng-Spot
    instanceTypes: ["c6g.medium","c6g.large","c6g.xlarge"]
    spot: true
    minSize: 1
    desiredCapacity: 1
    maxSize: 5
- 执行部署命令
eksctl create nodegroup -f spot-nodegroup.yaml
输出
2021-03-22 15:29:46 [ℹ]  eksctl version 0.39.0
2021-03-22 15:29:46 [ℹ]  using region us-west-1
2021-03-22 15:29:46 [ℹ]  will use version 1.18 for new nodegroup(s) based on control plane version
2021-03-22 15:29:46 [ℹ]  1 existing nodegroup(s) (ng-odoo) will be excluded
2021-03-22 15:29:47 [ℹ]  using EC2 key pair "odoo"
2021-03-22 15:29:47 [ℹ]  1 nodegroup (spot) was included (based on the include/exclude rules)
2021-03-22 15:29:47 [ℹ]  will create a CloudFormation stack for each of 1 managed nodegroups in cluster "odoo"
2021-03-22 15:29:47 [ℹ]  2 sequential tasks: { fix cluster compatibility, 1 task: { 1 task: { create managed nodegroup "spot" } } }
2021-03-22 15:29:47 [ℹ]  checking cluster stack for missing resources
2021-03-22 15:29:47 [ℹ]  cluster stack has all required resources
2021-03-22 15:29:47 [ℹ]  building managed nodegroup stack "eksctl-odoo-nodegroup-spot"
2021-03-22 15:29:47 [ℹ]  deploying stack "eksctl-odoo-nodegroup-spot"
2021-03-22 15:29:47 [ℹ]  waiting for CloudFormation stack "eksctl-odoo-nodegroup-spot"
2021-03-22 15:34:12 [ℹ]  waiting for CloudFormation stack "eksctl-odoo-nodegroup-spot"
2021-03-22 15:34:12 [ℹ]  no tasks
2021-03-22 15:34:12 [✔]  created 0 nodegroup(s) in cluster "odoo"
2021-03-22 15:34:12 [ℹ]  nodegroup "spot" has 1 node(s)
2021-03-22 15:34:12 [ℹ]  node "ip-10-0-157-39.us-west-1.compute.internal" is ready
2021-03-22 15:34:12 [ℹ]  waiting for at least 1 node(s) to become ready in "spot"
2021-03-22 15:34:12 [ℹ]  nodegroup "spot" has 1 node(s)
2021-03-22 15:34:12 [ℹ]  node "ip-10-0-157-39.us-west-1.compute.internal" is ready
2021-03-22 15:34:12 [✔]  created 1 managed nodegroup(s) in cluster "odoo"
2021-03-22 15:34:12 [ℹ]  checking security group configuration for all nodegroups
2021-03-22 15:34:12 [ℹ]  all nodegroups have up-to-date configuration
此过程需要花一点时间,eksctl 会通过 CloudFormation 创建相关的节点资源
大概数分钟后完成,您即新创建了一个由三种实例组成的Spot的工作组
完成后,您可以通过kubectl get nodes查看你的集群节点状态,您会多出来一台节点,在后面的压力测试中,节点还会自动增加,因为我们上一步创建节点组的描述文件中定义了最小1台,最多5台的Spot实例集群
NAME                                        STATUS   ROLES    AGE    VERSION
ip-10-0-157-39.us-west-1.compute.internal   Ready    <none>   2m    v1.18.9-eks-d1db3c
ip-10-0-5-191.us-west-1.compute.internal    Ready    <none>   153m   v1.18.9-eks-d1db3c
ip-10-0-62-185.us-west-1.compute.internal   Ready    <none>   153m   v1.18.9-eks-d1db3c
2,创建向 IAM 角色授予 Cluster Autoscaler 所需权限的 IAM 策略,使得 Cluster Autoscaler 能够具备操作 AWS AutoScaling 的权限。
- 首先在群集上为服务帐户启用IAM角色
eksctl utils associate-iam-oidc-provider \
    --cluster odoo \
    --approve --region us-west-1
- 编辑文件IAM权限描述文件
cat <<EoF > /home/ec2-user/k8s-asg-policy.json
{
    "Version": "2012-10-17",
    "Statement": [
        {
            "Action": [
                "autoscaling:DescribeAutoScalingGroups",
                "autoscaling:DescribeAutoScalingInstances",
                "autoscaling:DescribeLaunchConfigurations",
                "autoscaling:DescribeTags",
                "autoscaling:SetDesiredCapacity",
                "autoscaling:TerminateInstanceInAutoScalingGroup",
                "ec2:DescribeLaunchTemplateVersions"
            ],
            "Resource": "*",
            "Effect": "Allow"
        }
    ]
}
EoF
- 通过AWS CLI命令创建IAM权限
aws iam create-policy   \
  --policy-name k8s-asg-policy \
  --policy-document file:///home/ec2-user/k8s-asg-policy.json --region us-west-1
3,使用 eksctl 创建 Service Account 以及 IAM 角色,并将上一步创建的 IAM 策略附加到该角色 如果您自定义了集群名称,请将–cluster xxxx 替换为您的集群名称(若您没有使用默认配置) 请将 iam::xxxxxxxxxxxx:替换为您的账户ID(在您的aws控制台点击右上角可查看),例如263168716248(必须替换)
eksctl create iamserviceaccount \
    --name cluster-autoscaler \
    --namespace kube-system \
    --cluster xxxx \
    --attach-policy-arn "arn:aws:iam::xxxxxxxxxxxx:policy/k8s-asg-policy" \
    --approve \
    --override-existing-serviceaccounts --region xxxxx
替换完成后命令示例如下
eksctl create iamserviceaccount \
    --name cluster-autoscaler \
    --namespace kube-system \
    --cluster odoo \
    --attach-policy-arn "arn:aws:iam::263168716248:policy/k8s-asg-policy" \
    --approve \
    --override-existing-serviceaccounts --region us-west-1
输出
2021-03-22 18:16:01 [ℹ]  eksctl version 0.41.0
2021-03-22 18:16:01 [ℹ]  using region us-east-1
2021-03-22 18:16:06 [ℹ]  1 existing iamserviceaccount(s) (kube-system/aws-node) will be excluded
2021-03-22 18:16:06 [ℹ]  1 iamserviceaccount (kube-system/cluster-autoscaler) was included (based on the include/exclude rules)
2021-03-22 18:16:06 [!]  metadata of serviceaccounts that exist in Kubernetes will be updated, as --override-existing-serviceaccounts was set
2021-03-22 18:16:06 [ℹ]  1 task: { 2 sequential sub-tasks: { create IAM role for serviceaccount "kube-system/cluster-autoscaler", create serviceaccount "kube-system/cluster-autoscaler" } }
2021-03-22 18:16:06 [ℹ]  building iamserviceaccount stack "eksctl-my-odoo-addon-iamserviceaccount-kube-system-cluster-autoscaler"
2021-03-22 18:16:06 [ℹ]  deploying stack "eksctl-my-odoo-addon-iamserviceaccount-kube-system-cluster-autoscaler"
2021-03-22 18:16:06 [ℹ]  waiting for CloudFormation stack "eksctl-my-odoo-addon-iamserviceaccount-kube-system-cluster-autoscaler"
2021-03-22 18:16:44 [ℹ]  created serviceaccount "kube-system/cluster-autoscaler"
此过程需要花一点时间,eksctl 会通过 CloudFormation 创建相关的权限资源
通过以下describe命令进行验证
kubectl -n kube-system describe sa cluster-autoscaler
output
kubectl -n kube-system describe sa cluster-autoscalerName:                cluster-autoscaler
Namespace:           kube-system
Labels:              <none>
Annotations:         eks.amazonaws.com/role-arn: arn:aws:iam::263168716248:role/eksctl-odoo-addon-iamserviceaccount-kube-sys-Role1-1URHRUPLOEAAH
Image pull secrets:  <none>
Mountable secrets:   cluster-autoscaler-token-65cvv
Tokens:              cluster-autoscaler-token-65cvv
Events:              <none>
4,部署 Cluster Autoscaler,请直接复制执行下面命令
kubectl apply -f https://raw.githubusercontent.com/kubernetes/autoscaler/master/cluster-autoscaler/cloudprovider/aws/examples/cluster-autoscaler-autodiscover.yaml
输出
serviceaccount/cluster-autoscaler created
clusterrole.rbac.authorization.k8s.io/cluster-autoscaler created
role.rbac.authorization.k8s.io/cluster-autoscaler created
clusterrolebinding.rbac.authorization.k8s.io/cluster-autoscaler created
rolebinding.rbac.authorization.k8s.io/cluster-autoscaler created
deployment.apps/cluster-autoscaler created
4,执行以下命令将cluster-autoscaler.kubernetes.io/safe-to-evict批注添加到部署中。
kubectl -n kube-system \
    annotate deployment.apps/cluster-autoscaler \
    cluster-autoscaler.kubernetes.io/safe-to-evict="false"
5,通过kubectl edit编辑 Cluster Autoscaler 部署 (Deployment)
在 “spec: container: - command” 部分,将 <YOUR CLUSTER NAME>(包括 <>)替换为当前 EKS 集群的名称(默认为odoo),并添加 “–balance-similar-node-groups"以及”–skip-nodes-with-system-pods=false"选项
示范如下:
执行命令,翻到后半段
kubectl -n kube-system edit deployment.apps/cluster-autoscaler
修改部分如下所示(下面3行):
    spec:
      containers:
      - command:
        - ./cluster-autoscaler
        - --v=4
        - --stderrthreshold=info
        - --cloud-provider=aws
        - --skip-nodes-with-local-storage=false
        - --expander=least-waste
        - --node-group-auto-discovery=asg:tag=k8s.io/cluster-autoscaler/enabled,k8s.io/cluster-autoscaler/odoo
        - --balance-similar-node-groups
        - --skip-nodes-with-system-pods=false
完成修改后通过 esc键 输入 :wq 回车 保存并退出。
6,修改 Cluster Autoscaler 的 image 配置,复制执行以下命令
kubectl -n kube-system set image deployment.apps/cluster-autoscaler cluster-autoscaler=k8s.gcr.io/autoscaling/cluster-autoscaler:v1.20.0
7,查看 Cluster Autoscaler 日志,确认部署成功,复制执行以下命令
kubectl -n kube-system logs -f deployment.apps/cluster-autoscaler
8,您也可以通过命令autoscaling命令查看当前您的两个弹性扩展组状态。正常情况下,您现在拥有两个工作负载组,一个是onDemand的集群,最大节点数是1,一个是Spot的集群,最大值是4。当大规模负载发生时,会在Spot的集群进行扩容。平时的正常运行状态是1台Stop加2台onDemand
请将Value=='xxxx'的odoo替换为您的集群名称(默认为odoo),然后执行查看
aws autoscaling \
describe-auto-scaling-groups \
--query "AutoScalingGroups[? Tags[? (Key=='eks:cluster-name') && Value=='odoo']].[AutoScalingGroupName, MinSize, MaxSize,DesiredCapacity]" \
--output table --region us-west-1
输出
-------------------------------------------------------------
|                 DescribeAutoScalingGroups                 |
+-------------------------------------------+----+----+-----+
|  eks-76bc2c85-b42a-31e4-1ebd-fecc176e7c2b |  1 |  4 |  1  |
|  eks-92bbdf1d-2a89-4b89-9dec-11476f752afe |  1 |  2 |  2  |
+-------------------------------------------+----+----+-----+
部署 siege 并发压力测试,并观察Stop弹性扩展
1,登录到您的堡垒机,我们将使用堡垒机作为打压力的机器
2,安装编译器,复制执行以下命令
sudo yum -y install make gcc-c++ cmake bison-devel ncurses-devel libaio
3,下载并安装siege压测软件,复制执行以下命令
wget http://download.joedog.org/siege/siege-4.0.4.tar.gz
sudo tar -zvxf siege-4.0.4.tar.gz
cd siege-4.0.4/
sudo ./configure
sudo make && sudo make install
siege –help
4,配置打压力的URL,您需要在.txt文件中填入若干您测试打压的地址,例如http://a2171f3cd729b47f9816544bfcac9b4f-395e54af31ec6b78.elb.us-east-1.amazonaws.com/web/login以回车换行,这里的URL多多益善,因为siege打压工具会平均的对您填写的URL进行请求
sudo vim demo.txt
http://a2171f3cd729b47f9816544bfcac9b4f-395e54af31ec6b78.elb.us-east-1.amazonaws.com/web/login
http://a2171f3cd729b47f9816544bfcac9b4f-395e54af31ec6b78.elb.us-east-1.amazonaws.com/shop
http://a2171f3cd729b47f9816544bfcac9b4f-395e54af31ec6b78.elb.us-east-1.amazonaws.com/shop/akg-35
http://a2171f3cd729b47f9816544bfcac9b4f-395e54af31ec6b78.elb.us-east-1.amazonaws.com/slides
http://a2171f3cd729b47f9816544bfcac9b4f-395e54af31ec6b78.elb.us-east-1.amazonaws.com/shop/grado-36#attr=
http://a2171f3cd729b47f9816544bfcac9b4f-395e54af31ec6b78.elb.us-east-1.amazonaws.com/event
http://a2171f3cd729b47f9816544bfcac9b4f-395e54af31ec6b78.elb.us-east-1.amazonaws.com/forum
http://a2171f3cd729b47f9816544bfcac9b4f-395e54af31ec6b78.elb.us-east-1.amazonaws.com/shop/cart
http://a2171f3cd729b47f9816544bfcac9b4f-395e54af31ec6b78.elb.us-east-1.amazonaws.com/blog
http://a2171f3cd729b47f9816544bfcac9b4f-395e54af31ec6b78.elb.us-east-1.amazonaws.com/contactus
http://a2171f3cd729b47f9816544bfcac9b4f-395e54af31ec6b78.elb.us-east-1.amazonaws.com/event/jian-zhu-shi-hui-yi-2021-03-25-3/register
http://a2171f3cd729b47f9816544bfcac9b4f-395e54af31ec6b78.elb.us-east-1.amazonaws.com/shop/furn-8855-chou-ti-24#attr=
测试一下能否成功
 siege -c 200 -r 10 -f demo.txt

PID USER PR NI VIRT RES SHR S %CPU %MEM TIME+ COMMAND
138757 ubuntu 20 0 749832 600392 24500 S 115.6 3.7 0:54.48 python3

ubuntu@ip-172-31-41-179:~$ siege -c 100 -r 10 -f example-1.url
** SIEGE 4.0.4
** Preparing 100 concurrent users for battle.
The server is now under siege...
Transactions:                   5794 hits
Availability:                  88.40 %
Elapsed time:                  55.91 secs
Data transferred:             307.22 MB
Response time:                  0.68 secs
Transaction rate:             103.63 trans/sec
Throughput:                     5.49 MB/sec
Concurrency:                   70.22
Successful transactions:        5937
Failed transactions:             760
Longest transaction:           17.09
- siege的参数解释
-c, --concurrent=NUM 模拟有n个用户在同时访问,n不要设得太大,因为越大,siege消耗本地机器的资源越多
-r, --reps=NUM 重复运行测试n次,不能与-t同时存在
-t, --time=NUMm 持续运行siege ‘n’秒(如10S),分钟(10M),小时(10H)
-f, --文件路径,指定您的打压的地址,以回车换行,siege会随机向这些地址打压
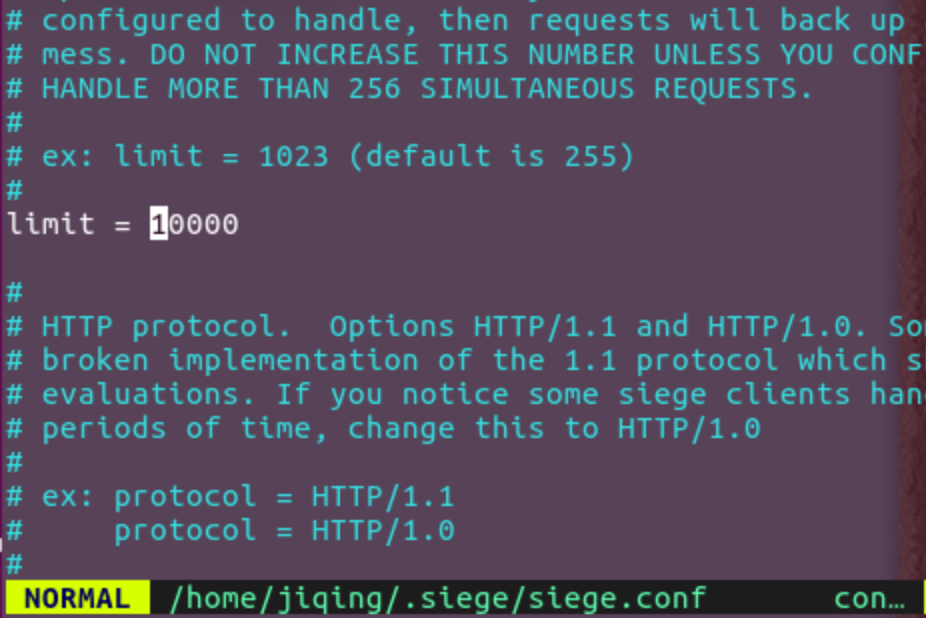
siege模拟有n个用户默认上线是255,您可以通过以下命令修改
sudo vim ~/.siege/siege.conf
开始正式打压
siege -c 200 -r 100 -f demo.txt
过程中您可以通过Kube dashboard ec2控制台等观察您集群的变化
注解
Transactions: 3419263 hits //完成3419263次处理
 Availability: 100.00 % //100.00 % 成功率
 Elapsed time: 5999.69 secs //总共用时
 Data transferred: 84273.91 MB //共数据传输84273.91 MB
 Response time: 0.37 secs //响应用时:请求发起至响应传输完成的速度
 Transaction rate: 569.91 trans/sec //均每秒完成 569.91 次处理:表示服务器后
 Throughput: 14.05 MB/sec //平均每秒传送数据
 Concurrency: 213.42 //实际最高并发数
 Successful transactions: 2564081 //成功处理次数
 Failed transactions: 11 //失败处理次数
 Longest transaction: 29.04 //每次传输所花最长时间
 Shortest transaction: 0.00 //每次传输所花最短时间
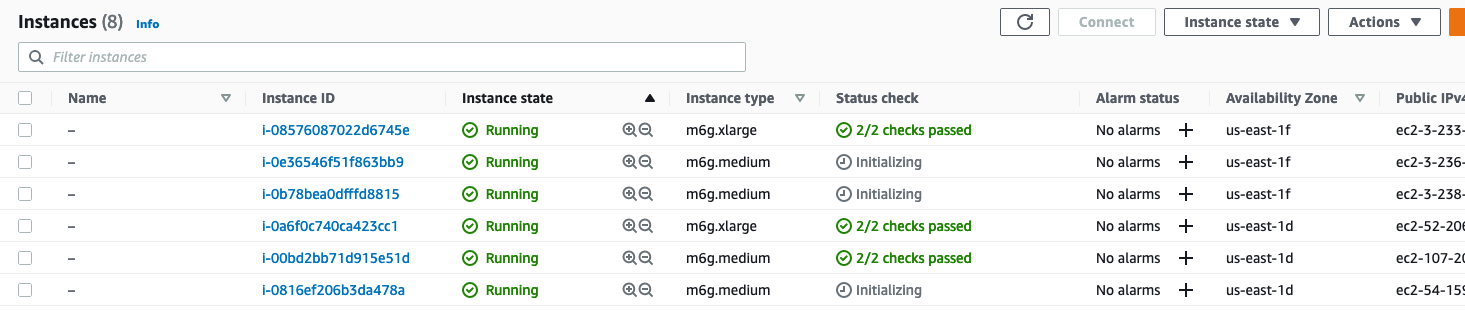
您可以通过EC2控制台查看到,我们的ASG新启动的几台实例
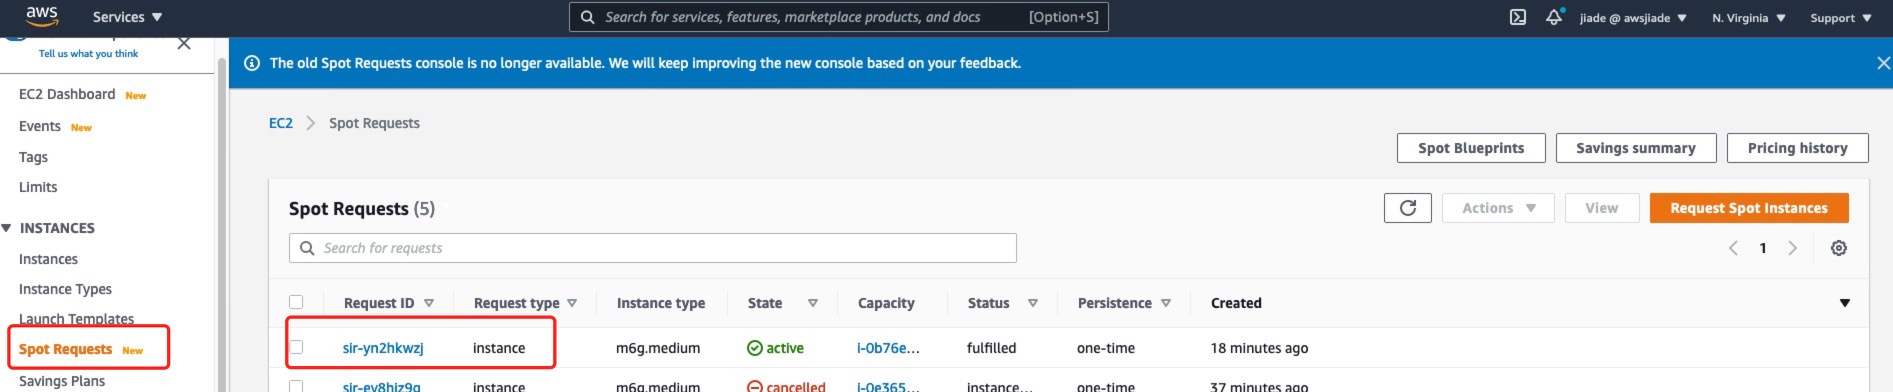
您可以通过EC2控制台左侧的Spot Requests页面查看您到您成功的启动了Spot实例
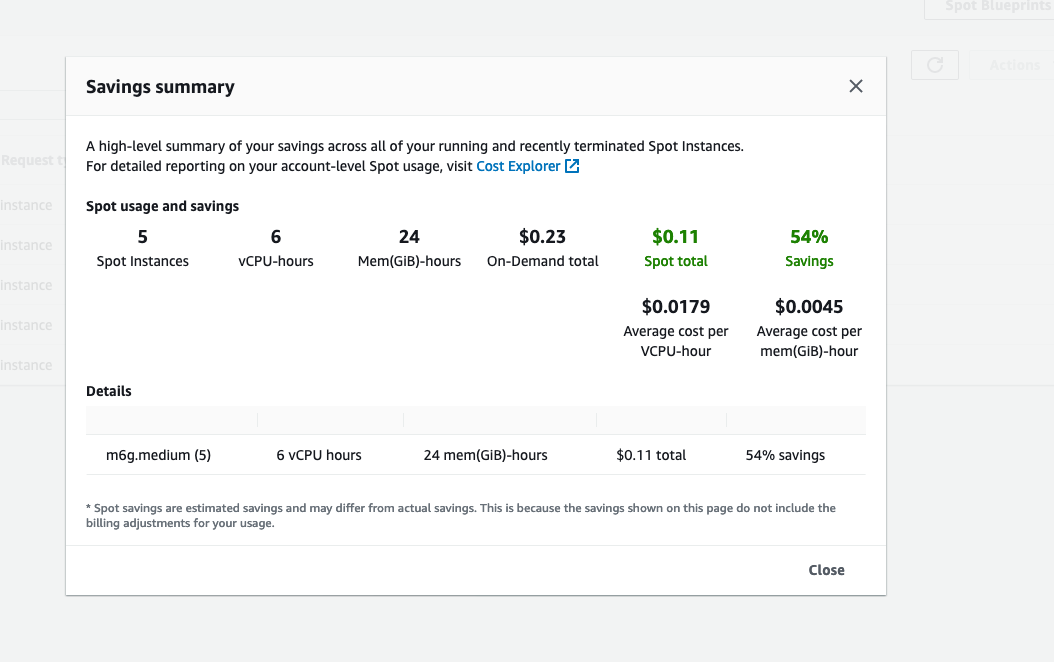
您可以点击Savongs summary查看spot实例为您节省了多少费用
到此,您完成了准生产环境自动弹性扩缩容,压力测试,竞价实例节省成本的演练